Pages

Friday, 20 July 2012

Chocolate Marble Cake


Preparation time: 10 minutes
Cooking time: 30 minutes
Makes one 8-inch cake


Ingredients

1 Cup Confectioners Sugar (powdered sugar)
1 Cup Self Raising Flour
1/2 Cup Olive oil (Can use vegetable oil too)
1 tsp Baking Powder
1 large Egg
1 tsp Vanilla extract
1 tbsp Cocoa Powder

1 tsp instant coffee powder
A pinch of salt
4 tbsp Coke


Method 

  1. Preheat the oven to 350F (180C). Grease and line your baking tin with butter paper and flour it lightly.
  2. In a large mixing bowl, combine eggs and sugar. Using a hand-held electric mixer or wire whisk beat until the mixture is creamy and light in color.
  3. Add oil, and continue beating until well blended.
  4. Sieve the flour, salt and the baking powder. Gradually add the flour mixture to the wet ingredients and beat just until the batter is smooth and the dry ingredients are thoroughly incorporated. Add Coke to adjust the consistency of battter. It should be not flowy but drop into a thick streak. DO NOT OVERBEAT to prevent air pockets from forming in the batter.
  5. Divide the mixture into 2 equal portions. I added the Vanila essence to one part.
  6. Add cocoa powder and coffee powder into the other part of the batter and mix well.
  7. Layer the vanila and chocolate batter alternatively in the cake tin. 
  8. Give a gentle swirl with a chop stick (with the tip of the chop stick touching the bottom of the pan).
  9. Bake for about 30-35 minutes or till a skewer inserted in middle come out clean.
  10. Mine cracked a bit at the top. It turned out to be very soft and spongy cake. Could top it up with chocolate sauce or frosting.


Monday, 9 July 2012

Poached Pears

Poaching is gentle, stove-top cooking. Firm and ripe pears are ideal candidates. They can be refrigerated or can be diced and used as ice cream or cake toppings or mixed with yogurt and can also be added to jams.
You can customize the poaching liquid to suit your taste, adding various spices, fresh ginger, vanilla beans, or wine to the mix. And can also change sweeteners, swapping out honey for sugar. 


Ingredients

1-2 firm ripe pears
2 cups sugar approx 250 gm
1litre water
Lemon peels of half a lemon
Juice of 1 lemon
Food coloring, a pinch ( I used red)
Spices of your choice ( I used 1 cinnamon stick , ginger,1/2 tsp nutmeg powder and 4 cloves)

Method

  1. Peel the pears. Leave the stems intact. If you want to cook them whole cut a very small section at the bottom and remove the seeds. or slice the pears to make them cook early. Immediately drop them in a bowl of water added with juice of a lemon, to avoid discoloring of pears.
  2. In a large saucepan, heat the water and sugar until warm and the sugar is dissolved. Add any of the additions that you wish.(lemon peel and spices) and the food coloring. Make sure saucepan is heavy bottomed else the liquid will burn while reducing it.
  3. Add in the pears, you can either use the whole pears which will take a longer to cook or sliced pears which will cook early. 
  4. Keep the liquid at a very low boil and simmer the pears until cooked through, 15 to 25 minutes, depending on the pears. In between keep on pushing the pears carefully into the  liquid, occasionally, if they float to the top.
  5. Remove from heat and let the pears cool in their liquid.
  6. After poaching the pears, reduce it to a sauce like consistency. Make sure you do it at a low flame else the liquid may burn and turn bitter. While the liquid is still warm, add approximately 1/2 cup (120 g) dried sour cherries, raisins, or dried currants and let them plump.

Serving

Serve the pears warm or at room temperature. Accompany with a scoop of ice cream and dark chocolate sauce, or just serve them whole topped with the poaching liquid you just reduced with some cookies at the sides.

Storage

Store the pears in their liquid in the refrigerator, in a covered container, until ready to use. Remove the pears from the refrigerator a few hours prior to serving, and re-warm them gently in the liquid, if you wish. The pears will keep for up to 5 days.

Sunday, 8 July 2012

Makki Ki Roti (Maize flour bread)

Ingredients


2 cups maize flour
1 tsp salt
5-6 coriander twigs, cleaned washed and chopped
1 green chilly, chopped
1 inch piece of ginger, chopped
Hot water to knead the flour

Method

  1. Mix all the ingredients in the flour, except water.
  2. Make a hole in the middle of the flour and pour very hot water to it. Mix it lightly with a spatula (it'll burn your hand, otherwise). Let it sit for few minutes or until you can handle the dough. Hot water helps the flour to settle well and also makes it easier to flatten it .  Make a dough which is not too tight or soggy. You should be able to shape the dough into a ball without it sticking all over your palm.
  3. Divide the dough into balls big enough you want your roti to be. The roti will be a bit thick from original wheat roti.
  4. Now thoroughly flour a platform (that you can later lift), you can use chopping board, or the same platform used to flatten roti's. 
  5. Flatten the ball a bit with your hands on the floured surface, gradually increasing it's size and flouring in between to avoid it sticking to the counter surface. Do all the flattening with hands.
  6. Now place your palm on the roti, lift the counter with other hand, invert it and slowly and carefully take the roti in your palm.
  7. Put it over a heated flat griddle or pan. Turn it on the other side after about 3-4 minutes of cooking or when you see light brown spots.
  8. Now cook on both sides with few drops of ghee to give it a thick brown colored spots.
  9. Serve hot , and oh yes, don't forget  sarson-da-saag

Saturday, 7 July 2012

Veg Soupy Maggi Noodles

Ingredients


1 pack of instant maggi noodles
1 small capsicum, sliced
1 small onion, chopped
1 small tomato, chopped
1 tsp cumin seeds
Water to boil
1 tbsp vegetable oil

Method

  1. Heat oil in a skillet. Add cumin seeds.
  2. When they start spluttering ad onion, capsicum. Cook till onions turn glossy.
  3. Add maggi masala, Stir and add tomatoes.
  4. Cook till oil separates on low flame. Add 3 cups of water now.
  5. Add in the noodles. Cook till noodles turn tender. Let the gravy be in the recipe.
  6. Serve hot garnished with chopped coriander leaves.

Friday, 6 July 2012

Ricotta Cheese

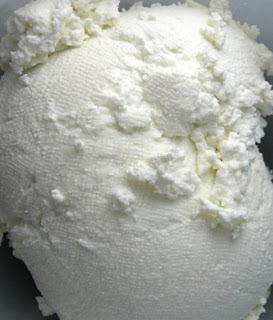
Ricotta is Italian for "recooked" because it is made by "cooking" whey. Ricotta cheese are creamy white in appearance, slightly sweet in taste, and contain around 13% fat and is bit like cottage cheese but much creamier. It makes delicious lasagna, gnocchi, cannoli or a type of cheese cake.

Ingredients


Leftover whey after making Cottage Cheese

Method

  1. Save the clear whey from making cottage cheese in a non-reactive heavy bottomed pan. Let it cool down at room temperature for 12-24 hours to develop acidity.
  2. Heat the acidified whey while stirring to avoid burning.
  3. Continue heating till it starts boiling and forms a foam at the top.
  4. Remove from heat and cover and allow the cooked whey to rest for 4-5 hours or till the curd is firm enough to take out.
  5. Do not stir the curd. Line a muslin cloth on a colander placed on a deep bottomed pan. Drain the contents in muslin cloth.
  6. Do not squeeze the cloth contents and let the whey drain out completely. 
  7. Pick up the corners of the cloth, suspend it like a bag over the drainage pot (or sink), and allow the last of the whey to drain out. It will take several hours, and can be done in the refrigerator over night.
  8. Remove the ricotta from the cloth, pack into a container, cover and store in the refrigerator. Use it soon after making. Alternatively, ricotta will freeze very well. It's highly perishable.

Cottage Cheese (Paneer)


Ingredients


1 litre full cream milk
2-3 tbsp lemon/ 1 tbsp vinegar

Method

  1. Boil the milk in the deep and heavy bottom  pan. Let it come to a gentle boil and stay there for a minute. Make sure the milk is not vigorously boiling. If it does, reduce the heat and bring the milk back to gentle boil.
  2. Add a tbsp of lemon juice to milk. At this point you'll see that milk will curdle. There wont be a clear whey visible. Keep stirring.
  3. Add another tbsp of lemon juice  and the curdles will increase and you will slowly begin to see the greenish whey. Depending on the acidity of the juice, the amount of juice you require may differ. Start with one tablespoon at a time till you achieve the results.
  4. Switch off the flame now and let the curd cool now.
  5. Meanwhile line a cheesecloth on a colander that's placed over a deep bottomed pan and transfer the contents to this cheese cloth.
  6. Once the whey has drained off completely,  wrap the ends of the cheesecloth over the cheese. Preserve the whey in refrigerator for future use to make ricotta cheese or as a stock for dals or to knead flour to make soft chapatis.
  7. Now you need to place some weights over this to make a firm block of cheese. I placed a plate over it and then my stone mortar. 
  8. Leave the weights on for about 2-3 hours and then what you get is firm and fresh cottage cheese. It'll make around 400-500 gm of cottage cheese.
Related Posts Plugin for WordPress, Blogger...